On the master host, edit the file /etc/snowflock/sfmd.cfg. Complete options
are given below in the
SFMD
configuration section (section 12). A template should have been
installed by the RPM in this location. In most cases, the only things that
need to be changed are the host name, memory and cpu allocation for each
host included in the Snowflock installation.
Once the sfmd.cfg and sfld.cfg files have been properly updated, the
Snowflock master daemon can be started on the master host, using the
command:
sfmd start
and the Snowflock local daemon can be started on every host, including the
master host, using the command:
sfld start
It is important that each host listed in the
cluster_hosts
option in the master host's sfmd.cfg file
actually be running a local daemon before any commands are issued to
Snowflock.
Alternatively, we provide a
snowflock-startup
script that will attempt to start the master daemon on the host where it is
called, and the local daemon on each host listed in the local sfmd
configuration. This script will use ssh, so be sure to have ssh keys
properly setup.
Important - Memory Considerations
The per-host memory value on the sfmd configuration in the master host
should be set so that the total memory "available" for Snowflock domains is
less than the total physical memory. Both domain 0 and the Xen hypervisor
operating on each host will need a certain amount of memory. While Xen
itself needs little memory, all memoy not allocated to domain 0 will be used
by Snowflock domains, and for Snowflock support. In fact, if domain 0
occupies all possible memory (the default), Snowflock will not have any
memory for its support and will not be able to operate properly. For
example, for a host with 2GB of RAM, we suggest to allocate 512MB for
domain0, and configure the corresponding entry in sfld.cfg with 1GB of
available memory for Snowflock domains (this is exagerated but safe).
The desired memory for domain0 should be configured using the command
xm mem-set 0 MEMORY
where MEMORY is the number of megabytes to set aside for domain 0. This
needs to be set each time a host is booted, and should be added to the
host's init scripts (OS dependent, typically /etc/rc.local). Alternatively,
the corresponding stanza in /boot/grub/menu.lst can be augmented with the
dom0_mem keyword, passing MEMORY expressed in KB (2^10) units, e.g:
kernel /xen-3.0.3-0.gz console=vga dom0_mem=MEMORY_KB
which will set the proper limit for domain0 memory each time the host boots.
3. Getting Started
Assuming you have:
-
installed the
snowflock rpm in
all hosts,
-
properly configured
/etc/snowflock/sfld.cfg
in all hosts (see section 11
here ),
-
started sfld in all
hosts,
-
started sfmd in all
hosts,
-
and have a VM image ready to use:
-
for example the one we
provide
in the project's webpage, or
-
one provided by
jailtime.org,
in which:
-
you have installed the
snowflock-guest
rpm, and
-
and have configured the network settings according to section 7
here
1. Your're now ready to go. The following assumes you have 3 cpus and 256*3
MBs of RAM configured as available in sfmd.cfg for clone use. Assuming you
have two hosts 'host1.mynet' and 'host2.mynet', with 2 cpus each and 2GB of
RAM each, and 'host1' has been chosen as the master, the following
/etc/snowflock/sfmd.cfg
(see
section 12) should
work:
master_listen_port = 0xF10C
cluster_hosts = [
{'host': 'host1.mynet', 'cpus': 2, 'RAM' :
2*(1<<30)},
{'host': 'host2.mynet', 'cpus': 2, 'RAM' :
2*(1<<30)},
]
network_mode = 'multicast'
Restart sfmd in you master host. Note we're assuming you can use multicast.
For more info on multicast see section 13
here.
2. Create a file sfseed.cfg containing the following three lines:
disk_image = "/path/to/vm.img" #pointing to the file containing the VM
disk image
vcpus = 1
memory = 256
3. Invoke sfseed sfseed.cfg
[root@host1 ~]# sfseed /root/images/e/sfseed.cfg
(2, '192.168.0.102/32')
4. What you got on stdin after a few seconds is a xen domain ID (e.g. 2) and
an IP address (e.g. 192.168.0.102)
5. Your VM is halfway booting, so be patient. You can:
5.a. ssh into 192.168.0.102, if you configured an ssh server
inside your VM
5.b Log into the VM's serial console with 'xm console 2' (If
you have root privileges in domain0)
6. Once logged into your VM, get a reservation for one extra clone
[root@VM ~]# sfdotix 1
Requested 1 clones, 1 allocations received.
Ticket is d4d660b0-054e-4017-8393-ad04ff1c1ff7
7. Now you have a reservation to clone one VM. Do it
root@VM ~] sfdoclone d4d660b0-054e-4017-8393-ad04ff1c1ff7
I am the master with 1 clones (original VM).
8. Your clone is now accessible with IP 10.0.0.2. Try pinging it, ssh into
it, etc
9. sfclone makes things even shorter
[root@VM ~]# sfclone 2
Requested 2 clones, 2 allocations received.
Ticket is a939ef76-48f1-4d5c-aae1-0529bd1044f4
Cloning...
I am the master with 2 clones (original VM).
Now you have two extra clones at IP 10.0.0.3 and 10.0.0.4
10. Get rid of the first clone. All of its state, including disk, will be
lost
[root@VM ~]# sfmerge d4d660b0-054e-4017-8393-ad04ff1c1ff7
Attempting to merge virtual cluster...
Successful merge for ticket d4d660b0-054e-4017-8393-ad04ff1c1ff7
11. And you can get rid of the other two guys just as easily
[root@VM ~]# sfmerge a939ef76-48f1-4d5c-aae1-0529bd1044f4
Attempting to merge virtual cluster...
Successful merge for ticket a939ef76-48f1-4d5c-aae1-0529bd1044f4
12. To safely shutdown this VM for now, call 'sfshutdown'
As we explain below, the scripts in this example are simply wrappers around
a
Python API described in
section 5. We also provide a
C API,
described in section 6. Here's an example of a similar exercise using
the Python API from within a Python interpreter. What you see at the end is
the VM beginning its shutdown sequence:
[root@VM ~]# python
Python 2.5.1 (r251:54863, Jun 15 2008, 23:59:20)
[GCC 4.1.2 20070925 (Red Hat 4.1.2-33)] on linux2
Type "help", "copyright", "credits" or "license" for more information.
>>> import snowflock
>>> (ticket, allowed) = snowflock.request_vm_ticket(2)
>>> ticket
'e8328dcb-d4d6-42cd-9859-4aeed35c746d'
>>> allowed
2
>>> snowflock.clone_master(ticket)
(0, 2)
>>> snowflock.merge_master(ticket)
>>> snowflock.shutdown_cluster()
Broadcast message from root (Wed Aug 27 14:50:57 2008):
The system is going down for system halt NOW!
INIT: Switching to runlevel: 0
INIT: Sending processes the TERM signal
Stopping sshd: [ OK ]
4.
Command-line reference
This section briefly describes each of the command-line scripts packaged
with Snowflock. The domain 0 scripts are used to administrate the
Snowflock system itself (e.g. to start a new Snowflock master domain), while
the user domain scripts are used to interact with Snowflock from within a
running domain (e.g. to allocate, create and destroy clones).
Domain 0 Scripts
sfseed CFGFILE
The
sfseed command
starts a new Snowflock domain from a Snowflock configuration file given by
the path
CFGFILE. The
command sfseed expects as its argument the name of a config file giving
details of a new master VM. The format of this config file, which like Xen's
config files is really just a python snippet, is simpler and more
restricted. An example is probably sufficient explanation of the format --
all keys must be present and will be validated prior to booting a new master
VM:
disk_image = "/path/to/my/disk/file.img" #string, must be a valid disk
image path
vcpus = 3 #int, max number of virtual CPUs to allocate to a clone of this
domain
memory = 256 #integer, megabytes
Note that at present we assume every Snowflock domain is using the single
packaged domU kernel. In future releases a kernel option may be added.
sfstate
This command prints out a summary of information about all host machines and
all running Snowflock domains.
sfmd [ start | stop
]
The
sfmd command
starts or stops the Snowflock master daemon on the host machine where it is
executed. The master daemon should only be started on a single host,
designated as the master host. If no errors are reported after
execution of "
sfmd
start" from the command line, the
daemon should be running and further commands such as sfseed should
work. However,
before running any further commands, a
Snowflock local daemon must be running on every host listed in the
sfmd.cfg file under
cluster_hosts,
including the master host if it is so listed.
sfld [ start | stop
]
The
sfld
command starts or stops the Snowflock local
daemon on the host where it is executed.
User Domain Scripts
sfdotix NCLONES
The
sfdotix command
performs a ticket allocation request for NCLONES clones of the domain from
which it is executed, each with the same number of processors as the
original. If the request is successful, the (uuid representing the)
ticket is printed. This ticket represents a reserved allocation of
physical resources to support N clones. The ticket may be passed to
sfdoclone to perform a cloning operation to actually instantiate the clones.
Additionally,
sfdotix
returns an integer indicating the number of clones actually granted. These
may be less than NCLONES due to resource availability issues.
sfdoclone TICKET
This command performs a clone operation, using the allocation reserved by
TICKET to provision new cloned domains. The
sfdoclone
command has the same fork-like semantics as the
corresponding API call
clone_master:
the command finishes (control is returned to the command prompt) on
each cloned domain with a message indicating success and the identity (vmid)
of the clone.
sfclone NCLONES
The sfclone command essentially combines the functionality of sfdotix and
sfdoclone. The sfclone command performs a ticket allocation request for
NCLONES clones of the domain from which it is executed, each with the same
number of processors as the original. If the request is successful,
cloning is performed immediately; if not, an explanatory message is
printed. Like
sfdoclone, this command
adheres to fork-like semantics; the command will terminate and return
control to the shell on each newly cloned domain.
sfmerge TICKET
The
sfmerge command
destroys all clones created using the given TICKET (a uuid string), or all
clones from all tickets if TICKET is the empty
string
('').
sfshutdown
The
sfshutdown command
attempts to shut down a master VM. This command will not proceed if there
are any clones not yet merged. This is the supported way for shutting down a
master Snowflock domain.
5. Python API reference
Domain 0 API
This section details the API calls available in the snowflock.dom0api python
package, which are available to programs running in domain 0 on a Snowflock
host machine. These calls operate by communicating with local and
master daemons. These calls are available by simply starting a python
interpreter and invoking 'import snowflock'.
dump_domain_state()
This function,
which is used by the script
sfstate,
returns a hash containing details about the state of each currently running
Snowflock domain.
dump_host_state()
This function,
which is used by the script
sfstate,
returns a hash containing details about the state of each
host
machine which is part of the Snowflock system as defined in the master
host's sfmd.cfg
file. This information includes the memory and vcpus available (not
occupied by running domains).
seed_new_cluster_from_sf_config(cfgpath)
This function instantiates a new Snowflock master domain from the file named
by the string
cfgpath.
The format of this file is given in the
sfseed
reference at the beginning of section 4. The functionality of this call
is wrapped by the script
sfseed.
User Domain API
The following is a list of the API functions in snowflock.domUapi, with
accompanying descriptions, which are available to programs running inside a
Snowflock hosted domain. These calls are also available by simply starting a
python interpreter and invoking 'import snowflock'.
request_clone_ticket(nclones, procs,
min, block)
Request a clone ticket. The parameter nclones specifies the desired
number of clones. The return value is a tuple
(ticket,
allowed_clones). The ticket is an authorization representing
physical resources held for cloning. It should be used to
perform a cloning operation via clone_master(ticket). The
integer
allowed_clones
reports the number of clones that will be created by this operation, which
may be less than or equal to the number requested (nclones).
If min is >= 0, the reservation can return a value between min and
nclones. If block is false, the call returns immediately with whatever
reservation it can obtain (could be no reservation).
The default behavior is to allocate
nclones VMs identical
to the caller, each with the same number of processors. If
procs is true,
nclones instead
specifies a number of processors to be obtained, spread out arbitrarily
across N VMs. Each VM, however, may not have more processors than those
initially allocated to the originating VM in the
sfseed configuration
file. For example, if
vcpus =
16 in the sfseed configuration, and
procs = True and
nclones =
23, you may get two VMs with 16 an 7
processors (or 15 and 8, etc)
request_vm_ticket(nclones)
Simple wrapper around request_clone_ticket for the common case of requesting
n VM clones.
request_proc_ticket(nclones)
Simple wrapper around request_clone_ticket for the common case of requesting
n processor clones.
list_tickets()
Shows all tickets in-flight. Returns a hash: under
"
unused", it reports
tickets you have requested but not yet cloned. Under
"
outstanding", it
reports tickets you have cloned but not yet joined.
clone_master(ticket)
Performs a pre-authorized (by ticket) cloning operation on the master domain
from which this function is called. The returned value is a tuple
(
nclones,
vmid).
nclones: the number of
clones actually created.
vmid: the unique
virtual machine id assigned to the receiving domain. Since master
domains always have a vmid of 0, this value can be checked to determine
whether the receiving domain is the original (master) or a clone (slave)
domain.
If cloning fails altogether, an exception will be raised.
dispose_ticket
Discards an unused ticket. Resources held by the ticket in advance of
cloning are relinquished. Ticket cannot be used afterwards.
ic_exit(ticket)
Destroys the calling domain. Works in conjunction with
ic_join. Only callable
by cloned VMs.
ic_join(ticket)
Blocks until all clones associated with the passed ticket have called
ic_exit. At that point
said clones will be destroyed, their disk state permanently lost, and this
call will return. Only callable by master VM.
ic_kill(ticket)
Synonymous with
merge_master.
merge_master(ticket)
Destroys all clones of the calling master domain generated by the passed
ticket. Note that all information on the disk of each clone will be
permanently lost. Only callable by a master domain. if
ticket is None all
active or outstanding tickets will be merged.
merge_all()
Merge all clones from all active tickets. Simple wrapper around
merge_master(None).
read_ticket_info(ticket)
Returns the allocation map associated with the ticket. This is a list of
(vmid, processors) tuples.
shutdown_cluster()
Shuts down the master vm, and releases resources for use by other machines
and virtual clusters. This method will not proceed if there are any
"outstanding" tickets: tickets upon which a clone operation has been
successfully called, but merging has not yet happened. This method is the
supported way to shut down a Snowflock impromptu cluster. This method may
only be called by a running master VM.
6. C API reference
The
C API is defined in the sf.h header file and is intended for use in the user
domain. Applications which use the API must link against the libsf library;
both archive and shared library versions are available.
The following are the common definitions and data structures used by the C
API:
#define SF_TICKET_SIZE
36
typedef struct sf_ticket_list {
struct sf_ticket_list *next;
char ticket[SF_TICKET_SIZE + 1];
} sf_ticket_list;
typedef struct sf_clone_info
{
struct
sf_clone_info *next;
int
vmid;
int
processors;
}
sf_clone_info;
typedef struct sf_result
{
union
{
int allowed_clones;
int number_clones;
}
rc;
int
vmid;
char
ticket[SF_TICKET_SIZE +
1];
struct
sf_clone_info *clone_list;
struct sf_ticket_list *unused_tickets;
struct sf_ticket_list *outstanding_tickets;
}
sf_result;
The function protoypes and brief descriptions of the C API are given below:
extern struct
sf_result * REQUEST_CLONE_TICKET(int
nclones,
int procs,
int min,
int block);
Requests the allocation of a ticket for a specified number of clones or a
number of processors:
-
nclones - the
number of the required resources desired.
-
procs - if true,
nclones specifies a number of processors to be obtained, spread out
arbitrarily across n VMs. Otherwise, specifies the number
of VMs required.
-
min - specifies a
minimum number of the requested resources (VMs or processors) that will
satisfy the request. A value less than 0 means that the full number
requested is required.
-
block - if false,
the call returns immediately with whatever reservation it can obtain
(could be no reservation). If true, waits until it can fulfil the whole
request (or until a permanent failure occurs).
On success,
allowed_clones contains
the number of allocations actually received, and ticket contains the ticket
reference.
On error, a NULL pointer is returned.
extern struct
sf_result * REQUEST_VM_TICKET(int nclones);
Invokes REQUEST_CLONE_TICKET to request
n VM clones in
blocking mode.
extern struct
sf_result * REQUEST_PROC_TICKET(int nclones);
Invokes REQUEST_CLONE_TICKET to request
n processor clones in
blocking mode.
extern struct
sf_result * LIST_TICKETS(void);
Shows all tickets in-flight. On success:
-
unused_tickets -
reports tickets requested but not yet cloned, and
-
outstanding_tickets
- reports tickets cloned but not yet joined.
extern struct
sf_result * READ_TICKET_INFO(char *ticket);
Obtains the allocation map associated with the ticket. This is a list of
(VMID, processors) tuples and is returned in the
clone_list field of the
result structure. The ticket field is returned as a sanity check.
extern void
DISPOSE_TICKET(char *ticket);
Discards an unused ticket. Resources held by the ticket in advance of
cloning are relinquished. The ticket cannot be used afterwards.
extern struct
sf_result * CLONE_MASTER(char *ticket);
Invokes the cloning procedure for a specified and previously obtained
ticket.
On success,
number_clones contains
the actual number of cloned VMs started, and
vmid contains the
machine id of the VM (different for each VM started).
On error, a NULL pointer is returned.
extern int
MERGE_MASTER(char *ticket);
Invokes the merging of all slave clones connected to a particular ticket
with the master.
On success, returns 0.
On error, returns non-zero.
extern void
MERGE_ALL(void);
Calls MERGE_MASTER with a parameter of "None", which causes all outstanding
tickets to be merged.
extern int
IC_KILL(char *ticket);
Invokes the merging of all slave clones connected to a particular ticket
with the master.
On success, returns 0.
On error, returns non-zero.
extern void
IC_JOIN(char *ticket);
Makes the master wait on slaves until they have exited. Same semantics as
the wait()/waitpid() library calls for processes.
extern int
IC_EXIT(void);
Requests the exit of a cloned VM, which causes the master that cloned it to
be notified if it is the last slave of a ticket to exit and the master has
called IC_JOIN.
On success, would return 0 if it returned, but should not return, as the
virtual machine should be destroyed.
On error, returns and returns a non-zero value.
extern int
SHUTDOWN_CLUSTER(void);
Requests the shutdown of a cluster. The action is only permitted if there
are no active clones.
On success, would return 0 if it returned, but should not return, as the
cluster master should shutdown.
On error, returns and returns a non-zero value.
extern void FREE_SF_RES(struct sf_result * res);
Releases all memory held by this res structure, regardless of what API call
returned it. The res pointer is unusable after this call.
7. Snowflock Impromptu Cluster Network
Settings
Snowflock provides a controlled network environment for master domains and
their clones. You must configure your VM accordingly, or network
functionality will be limited.
-
The master VM will have a single network interface,
eth0, statically
configured (no dhcp).
-
The master VM has an IP of
10.0.0.1/8, i.e. a
255.0.0.0 netmask
or class A subnet.
-
The network adress is
10.0.0.0, and the
broadcast address is
10.255.255.255.
-
The DNS server and the network gateway are 10.255.255.254.
-
Broadcast/multicast traffic is disabled between a master and its clones,
except for ARP queries.
-
An external IP address is provided for the whole cluster. Only ssh,
http, and telnet (ports 22, 80 and 23 respectively) traffic is forwarded
from this external IP address to the master VM
(10.0.0.1). This
external IP address is obtained via dhcp, and relayed to the user by the
sfseed
script.
The configuration of internal network parameters is distribution dependent.
We provide here directions for debian and red-hat based distributions. For
red hat-like, edit
/etc/sysconfig/network/network-scripts/ifcfg-eth0
DEVICE=eth0
BOOTPROTO=none
IPADDR=10.0.0.1
NETMASK=255.0.0.0
ONBOOT=yes
GATEWAY=10.255.255.254
For debian-like, edit
/etc/network/interfaces
auto lo
iface lo inet loopback
iface eth0 inet static
address 10.0.0.1
netmask 255.0.0.0
network 10.0.0.0
broadcast 10.0.0.255
gateway 10.255.255.254
Finally, for both distribution flavours, DNS can be configured in
/etc/resolv.conf
nameserver 10.255.255.254
Each clone has a unique
vmid, an integer uniquely identifying
the clone among its peers. The clone's IP address is automatically set upon
clone instantiation. The IP address will be the host number (vmid+1) in the
10.0.0.0/8 network, i.e.
10.0.0.42 for vmid 41,
or 10.0.1.1 for vmid
256. All other IP settings remain identical.
Network communication between clones originating from the same master is
unfettered. However, clones cannot talk to clones in another Snowflock
impromptu cluster. There is a whitelist of external IP networks and hosts to
which the clones (and the master VM) can connect. The whitelist is defined
in the sfmd configuration file described in section 12
here. Another parameter defined in
the sfmd configuration is a bandwidth cap that can be used to limit the
inbound/outbound traffic between each virtual cluster and the hosts and
networks on the whitelist.
The host 10.255.255.254 is a specialized "router" VM (in effect an IP
router, nat, firewall, and traffic limiter). This VM is automatically
started upon cluster creation
(
sfseed) from a
template image. The router VM is not configurable or accesible (ssh, rsh,
etc) to the master VM or clones. It is, of course, "pingable" and capable of
forwarding IP traffic. The administrator, i.e. a person logged in domain0
with root privileges, is able to log into the router VM. Such VM only has
the root account, with the password 'routerbio'.
Failure to configure your master VM and clones appropriately (i.e. with the
correct network mask, DNS server and gateway, and
10.0.0.1 IP for the
master) will certainly result in no connecticity to hosts and networks in
the whitelist, and very likely in no connectivity between clones. You are,
of course, free to configure your VMs at will otherwise.
8. MPI Tools Reference
The
mpisf package
includes a version of the popular MPI library
mpich
which is modified to create cloned domains to host MPI processes for each
program execution.
In a standard environment, a user MPI program
mpitask compiled against the
standard
mpich
libraries will normally be invoked using that
package's mpirun
command as follows:
mpirun -np
NUMPROCS mpitask
[ARG1 ARG2...]
where ARG1 ARG2...
are arguments to the user
program.
The Snowflock version of the command,
sfmpirun, is invoked
in a similar way to standard mpirun, but uses extra parameters to specify
the port numbers to be used for various communication purposes:
sfmpirun [-i
stdin_port] [-o stdout_port] [-e stderr_port] [-l listener_port] [-m
manager_port] [-v] NUMPROCS mpitask
[ARG1
ARG2...]
This enables the user to specify what ports to use for redirection of
standard I/O and the process and manager connection ports. Each specified
port number must be distinct and available. In general you do not need to
specify these ports, as they are selected randomly between the set of
available ports.
However, while the standard version instantiates MPI processes in a number
(NUMPROCS) of pre-existing daemons running on a number of compute hosts,
the Snowflock version "creates" (clones) a number of compute hosts which
will run the MPI processes. The number of clones will be sufficient
so that each MPI process is run on a separate virtual cpu, unless
insufficient resources are available, in which case the request to run the
application will fail. If sfmpirun cannot get a reservation for as
many clones as desired, it will fail and you can retry with less clones.
The -v switch can be used to specify that VM cloning should be used, i.e.
NUMPROCS VMs should be cloned, on each of which one MPI application
process will be run. The default is for processor cloning to be used; in
this case, NUMPROCS processors will be created in n VMs,
and one MPI application process per virtual CPU will be run. The number
n here is determined by the number of virtual CPUs the
original VM is configured to have (vcpus in the configuration file) and is
given by the ceiling of NUMPROCS/vcpus. It is recommended to use the
default option of cloning processors.
In this way, one can simply launch the mpitask program, and the necessary
number of parallel workers will be automatically created, all contained by
virtual machines. Upon termination of the MPI job, all clones created for
that purpose will be cleaned up. Impromptu parallelism at the service of
unmodified MPI programs.
There are two versions of
sfmpirun available.
One,
sfmpirun.sigs,
uses UNIX signals as part of the interprocess communication mechanism. The
other,
sfmpirun.nosigs, uses
TCP/IP for that purpose. The version that uses UNIX signals is directly
compatible with the standard MPICH implementation, and binaries statically
linking against the standard libraries should work with it without change.
The TCP/IP version has been more heavily modified and requires statically
linked executables to be recompiled against the new version of the library,
though dynamically linked executables should be able to pick up the new
library. It is recommended for performance purposes to use the TCP/IP
version. These should not be a burden since most MPI programs are provided
as source code and/or dynamically linked executables.
9. Snowflock Resource Allocation
Integration
Snowflock tracks the hardware resources (memory and CPUs) available on each
host machine, to determine how many resources are available for new master
domains and clones. These resources are global -- all users of the
system share a single resource pool.
This release of Snowflock supports 3 methods of host machine resource
tracking and allocation. The default method is for Snowflock to use
the host resource information given in the
sfmd.cfg file (section 12), and
remain oblivious to resource requests outside of the system. The two
other methods of resource allocation integrate with popular grid computing
task management systems: Platform EGO and Sun Grid Engine. Both EGO
and SGE also update the running instance of the host state hash, which can
be consulted via the
sfstate command and
dump_host_state python
API call. The operation of these allocators is detailed in the subsections
below.
Default Allocator
The default allocator uses the information supplied to the
cluster_hosts
parameter in the
sfmd.cfg file
to maintain a simple representation of hosts and their resources. When
a ticket request is made, the default allocator will try to allocate
clones fairly to each host following two principles. First, no host will see
its resources overflowed by clones. Second, no host will have more than one
extra clone running than any other host. Within those constraints, clones
are allocated to hosts randomly.
SGE Allocator
The SGE allocator works by submitting tasks representing a clone allocation
to a running SGE system which is managing tasks on the host machine
cluster. SGE must be running on all host machines before the Snowflock
master domain is started when using the SGE allocator. When SGE schedules a
task, the SGE allocator is informed that the host where the task is running
is available for a Snowflock domain. A clone ticket request will cause
an appropriate number of tasks to be submitted to the SGE queue, and when
all tasks have been scheduled and are running on host machines, the ticket
will be granted.
In order for SGE allocation to work correctly, the SGE queue on each host
machine should be configured to match the recommended allocation maximums
given for the default allocator above. The desired number of vcpus
should be expressed both in terms of processors and in terms of "slots" in
SGE parlance. See SGE
documentation
for details.
EGO Allocator
The EGO allocator works by delegating requests for resources (memory and
cpu) to Platform EGO, which must be running on all host machines prior to
starting up the Snowflock master daemon. The semantics of the EGO
Allocator are essentially identical to that of the default allocator, except
that the record of available resources is kept by EGO rather than by
Snowflock itself, and resources may be consumed by external uses other than
Snowflock. In addition, EGO must be configured with a Snowflock
"consumer" (see Platform EGO documentation for details and
terminology). This can be accomplished by adding the following stanza
to the EGO configuration file
/share/ego/kernel/conf/ConsumerTrees.xml,
under the <Applications> tag within the
<ConsumerHierarchy> hierarchy:
<Consumer ConsumerName="SnowFlock">
<ConsumerProperties>
<User>Guest</User>
<ExecutionUser>egoadmin</ExecutionUser>
<ReclamationTimeout>30</ReclamationTimeout>
<Rebalance>false</Rebalance>
</ConsumerProperties>
</Consumer>
and in <DistributionTree>, each host machine should be registered as
both ManagementHost and ComputeHost, under <Applications>:
<Consumer ConsumerName="SnowFlock">
<DistributionPolicies>
<Priority>50</Priority>
<SharingPolicy>
<Shares
Type="ratio">1</Shares>
</SharingPolicy>
</DistributionPolicies>
</Consumer>
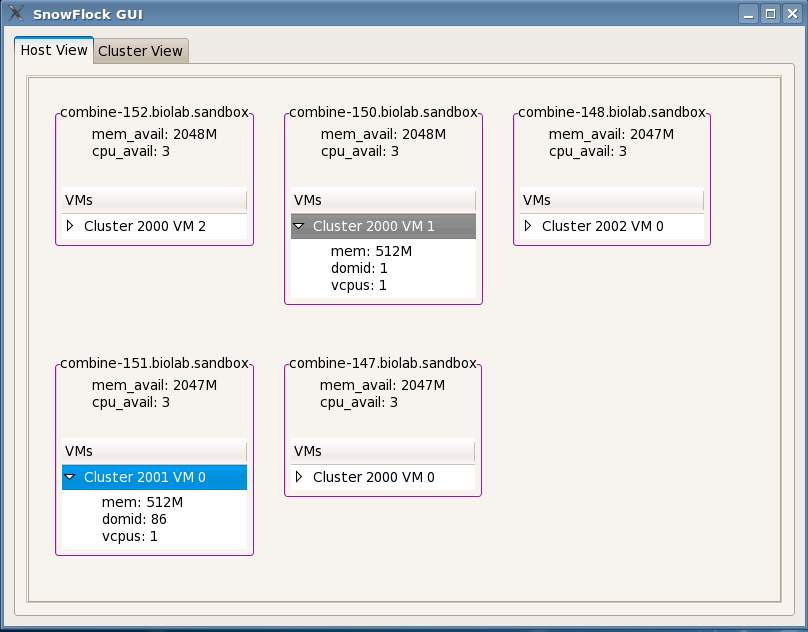
10. GUI Reference
A Snowflock GUI is provided which makes it easy to see at a glance what VMs
exist on each host, along with the resources occupied and available on each
host. This GUI can be started by invoking
SFDashBoard on any host
running a local daemon.
The main purpose of the GUI is to provide a more convenient, "at-a-glance"
overview of which hosts are part of a running Snowflock system, and what
domains are in operation.
The main panel of the GUI has two tabs, one labelled "Host View" and another
labelled "Cluster View". The Host View tab details the resources
available on each host machine. The "Cluster View" tab displays
information about each running Snowflock domain.
11. SFLD Configuration Options
Each host machine must have the Snowflock local daemon
(
sfld) running in order
to host Snowflock domains. The local daemon reads a configuration file
located at
/etc/snowflock/sfld.cfg.
Each configuration option is listed below. Required parameters are
denoted with a leading asterisk.
*hostname
This parameter gives the "canonical" hostname by which Snowflock will
identify the physical host internally. The name must resolve to the
correct IP on all physical hosts (it may be an explicit IP address).
In particular the resolution of the hostname given here must match the IP
given in the
sfmd.cfg
file to the
cluster_hosts
parameter. Example:
hostname = 'who.where.com'
#string, must resolve to an IP
address
#using socket.gethostbyname()
*master_host
Specifies the hostname of the physical host on which the Snowflock master
daemon (sfmd) will run. Same rules for name resolvability apply.
Example:
master_host = '192.168.1.3'
#string, must resolve to an IP
address
#using socket.gethostbyname()
master_port
The master daemon
(
sfmd) listens for
messages from local daemons and command-line scripts on a designated TCP
port. By default the port is 0xF10C, but may be changed using this
parameter. Example:
master_port = 0xC001
#integer, must be a valid free TCP port
local_listen_port
The local daemon listens for messages from the master daemon and
command-line scripts on a designated TCP port. By default the port is
0xC01F, but it may be changed using this parameter. Example:
local_listen_port =
0xDEAD-0xBEEF #integer, must be a valid free TCP port
12. SFMD Configuration Options
The master daemon's configuration file, which must be located at
/etc/snowflock/sfmd.cfg
on the master
host, contains options which
determine the global configuration of a Snowflock system running on host
machines. This file is used to determine which hosts are available to
host Snowflock domains, lists their available resources, and also has a few
global options determining behaviour across all
hosts.
The remainder of this section gives the details of each individual option
which may be set in the sfmd.cfg file. Required parameters are denoted
with a leading asterisk.
clusterid_start
When a new Snowflock cluster is created, normally using the
sfseed command, it is
assigned a unique "clusterid" which will be shared with all clones.
The clusterid represents the identity of the virtual cluster within which a
master domain and all its slaves are maintained in isolation -- domains with
the same clusterid share a virtual network isolated from domains with
different clusterids. By default, the first clusterid assigned is 0,
and each subsequent master domain will be assigned a succeeding
clusterid. For testing purposes it is sometimes desirable to have new
clusters created at a higher offset. An example setting for this
parameter is given below:
clusterid = 2000 #value must be an integer.
master_listen_port
The master daemon
(
sfmd) listens for
messages from local daemons and command-line scripts on a designated TCP
port. By default the port is 0xF10C, but may be changed using this
parameter. For example
master_listen_port = 2000 #must be a valid TCP
port.
Note that if this parameter is changed, the corresponding
master_listen_port
setting in each local daemon's configuration file must also be changed.
*cluster_hosts
This is the key configuration parameter which determines which host machines
are available for allocation of Snowflock domains. It also specifies
the memory and vcpu resources available at each host machine. This
resource information is used by the default domain allocator to assign
cloned domains to hosts, and to determine whether a clone ticket request may
be satisfied. The format of the parameter is that of a python list of
dictionaries, where each dictionary defines the keys 'host', 'cpus', and
'RAM' as illustrated in the following example:
cluster_hosts = [ # start of list
{ #start of dictionary for first host
'host' :
['myhost.mydomain.com','101.102.103.104']
#unicast name, multicast
name
'cpus' : 3 #integer normally
should not exceed physical cpus
'RAM' : 3*(2**30) # integer
bytes should be less than
# physical memory, see
guidelines
},
... #additional host dictionaries, comma separated
]
network_mode
This parameter can be set to string values of either 'multicast' or
'unicast'. The default is multicast. Multicast provides
substantially better performance, but must be supported by the network
switch connecting physical hosts in a LAN; unless you are sure your switch
does not support multicast groups, use the default. For more information on
multicast, see section 13
here.
Example:
network_mode = 'multicast'
network_whitelist
This parameter is used to specify which Internet addresses should be
accessible to Snowflock domains from inside their virtual cluster. The
value is a python list of strings, where each string may be an IP address,
an IP subnet, or a DNS name. Note that DNS names are resolved
when a virtual cluster's master domain is started for the
purpose of network configuration. An example setting is given below
network_whitelist = [ # start of list
'www.google.com',
'compbio.utoronto.ca', #sure to be popular
'192.168.1.0/24', #example subnet of physical cluster
IPs
'209.132.224.53' #external internet IP
]# end of list
bandwidth_cap
This parameter can be set to an integer. It specifies the maximum
instantaneous traffic rate, in megabits per second, that is to be allowed
between the domains making up a Snowflock impromptu cluster and the hosts
and network in the whitelist. To set the cap to 20 Mbits/s:
bandwidth_cap = 20
13. Multicast Support
Snowflock performs best when using IP multicast to simultaneously distribute
VM state to all clones in an impromptu cluster. Use of IP multicast is
dependent on a capable network switch. While we doubt your household 4 port
switch will properly support multicast, any other decent switch should be
able to.
In the sfmd configuration file, the 'host' key for each entry in the
'cluster_hosts' hash can be a single entry, or a list with two components.
If the former applies, then the multicast and unicast addresses will be the
same. If the latter has been provided, the first address will be used for
unicast traffic, while the second one will be used for multicast traffic.
Unicast will be used for all exchanges between Snowflock daemons running in
domain0, for traffic between domains, and for domain state distrbution if
the 'network_mode' has been set to 'unicast'.
The rationale behind a separate address for multicast traffic is based on
the observation that most cluster-class boxes contain two Ethernet NICs,
thus allowing an effective separation between "normal" traffic, and
multicast traffic used for VM state distribution, which can be potentially
intensive. Furthermore, channeling the multicast traffic on its own parallel
Ethernet network allows setting high MTU values which result in more
efficient network transmission. High MTU values need to be uniformly set
across all hosts and switches, and may result in conflicts and crashes.
Again, by channeling multicast traffic on its own parallel network, one can
experiment with high MTUs without disrupting the normal functioning of the
cluster.
In brief, if you have boxes with two NICs, are not using the second NIC, and
have spare time, cables, and switches to wire a secondary Ethernet network
using the second NICs, we
highly recommend you use this
second physical network for multicast. If your switch and NICs support
it, we recommend you set a high MTU as well (i.e. 5000) to get the most
juice out of Snowflock.
However, multicast will work well on more conventional network
configurations: single NIC, normal 1500 MTU.
The
snowflock rpm
installs a library called
mcdist which is in
charge of multicast transmissions. Mcdist is configured by the
/etc/rc.d/init.d/mcdist
file which is added to the set of startup scripts on each host on which the
snowflock rpm is
installed. There are two important parameters that you need to specify in
that file
-
INTERFACE:
on which interface will multicast happen
-
INTERFACE_MTU:
with which MTU will multicast happen. The default MTU used everywhere is
1500. These parameter must be set identically on all hosts using
multicast
Regarding dual-NIC installation: if your machine has two NICs you may
need to adjust Xen's networking configuration before booting. The (a)
network interface that has contact with the outside world should be chosen
for the Xen virtual bridge. You can achieve this by editing
/etc/xen/xend-config.sxp
and uncommenting and setting the line
# (network-script 'network-bridge netdev=eth1')
with the appropriate interface
in the
netdev
field. While entirely at your discretion, we suggest this interface to be
not the one that will be doing multicast. For more information on
Xen networking and the Xen virtual bridge, consult the
Xen
Networking entry of the Xen wiki.
14. Security Notes
This release of Snowflock makes essentially no security provisions or
guarantees of any kind.
Because Xen itself requires root privileges to perform many actions, the
Snowflock daemons also must be executed as root. Although it is not
necessary for domain 0 scripts such as
sfseed to be executed
with root privileges, no user-level security privilege checking is done to
authenticate actions taken by these scripts. Furthermore,
Snowflock configuration files may contain arbitrary python code,
which will be executed as root. This follows Xen's own convention
for VM configuration files, which also contain arbitary python code.
There is no reason for an ordinary configuration file to cause any damage to
the system, as ordinarily it should contain nothing more than simple
key/value assignments. In a future release an isolation scheme may be
introduced to protect the system from unauthorized and malicious use, but
for now it should be assumed that any user with permission to execute
Snowflock administrative scripts has complete root access to physical hosts.
Users who merely have permission to log into an existing Snowflock master
domain, on the other hand, are not intended to have any access to the host
machines, domain 0, or other Snowflock domains; this is a virtue of the
system. However, for the purposes of this release, such isolation
should not be considered bullet-proof as it has not been audited for
security vulnerabilities.